RSS
Aside

Blue Being Cool

Index


Index of Posts

 
Leave a comment

Posted by on October 21, 2015 in Miscellaneous


Proper Case and Title Case Methods for Apex

Proper Case and Title Case Methods for Apex

Apex doesn’t have a built-in proper case or title case method. Apparently this isn’t something that is in too high of a demand–on the idea exchange there are only 26 votes for a properCase or titleCase method to be added to the String class (https://success.salesforce.com/ideaView?id=08730000000Do1xAAC).

This sort of bums me out because I love having a database that is all clean and pretty without any SHOUTING or whispering (all lowercase when capitalization is more appropriate).

So I guess it’s time to get to work and write a couple of my own methods:

  • toProperCase
  • toTitleCase

Method 1 – toProperCase

Prim and proper lady

This method is the one I’ll use most often. It’s designed to handle phrases that do not have peoples’ names.

After writing my first draft I found a nice little method posted on the Salesforce Developer forum (https://developer.salesforce.com/forums?id=906F00000008ukJIAQ) that had a really cool idea to store words typically kept lowercase in a set, and to always capitalize the first and last words (my first version just capitalized every word no matter what).

Here is the resulting code:

/**
 * @TO_PROPER_CASE
 * turns all words in a text string to proper case except those that should be kept lower case
 * first and last words are always capitalized
 * Example: "sally sue sews shirts" --> "Sally Sue Sews Shirts"
 * this method does not handle parts of names that are kept lowercase of have a capitalized character within the name
 *
 *String str = toProperCase(str);
 */
public static String toProperCase(String str){
   if(str.trim().length() == 0) return str;
   Set lcaseWords = new Set{'a','an','and','at','but','for','in','nor','of','or','the','to','with'};
   String[] words = str.toLowerCase().normalizeSpace().split(' ');
   String rslt = words[0].capitalize(); //always capitalize the first word
   for(integer i=1; i<words.size()-1; i++){
      if(lcaseWords.contains(words[i])) rslt += ' ' + words[i];
      else rslt += ' ' + words[i].capitalize();
   }
   rslt += ' ' + words[words.size()-1].capitalize(); //always capitalize the last word
   return rslt;
} //end method toProperCase

Method 2 – toTitleCase

title case

This method had a few additional little words that are typically kept lowercase in a person’s name – things like van, von, de, and la. It also attempts to accommodate Mc, Mac, Van, and Von prefixes.

/**
 * @TO_TITLE_CASE
 * turns all words in a text string to proper case except those that should be kept lower case
 * first and last words are always capitalized
 * Example: "sally van ferstenclass" --> "Sally van Ferstenclass"
 * this method handles parts of names that are kept lowercase of have a capitalized character within the name
 *
 *String str = toTitleCase(str);
 */
public static String toTitleCase(String str){
   if(str.trim().length() == 0) return str;
   Set lcaseWords = new Set{'a','an','and','at','but','for','in','nor','of','or','the','to','with','de','la','the','van','von'};
   String[] words = str.toLowerCase().normalizeSpace().split(' ');
   String rslt = '';
   for(integer i=0; i 2 && str.startsWith('mc')) rslt += ' Mc' + str.right(str.length()-2).capitalize();
      else if(str.length() > 3 && str.startsWith('mac')) rslt += ' Mac' + str.right(str.length()-3).capitalize();
      else if(str.length() > 3 && str.startsWith('van')) rslt += ' Van' + str.right(str.length()-3).capitalize();
      else if(str.length() > 3 && str.startsWith('von')) rslt += ' Von' + str.right(str.length()-3).capitalize();
      else if(lcaseWords.contains(words[i])) rslt += ' ' + words[i];
      else rslt += ' ' + words[i].capitalize();
   }
   return rslt.trim();
} //end method toTitleCase


So there you have it. Not earth shattering, but possibly useful.

Cheers!

 
1 Comment

Posted by on February 2, 2018 in Apex, Utility Methods


Tags: ,

Apex Tidbits

Apex Tidbits

Here is a collection of little tidbits I’m noticing while learning Apex. I’ve just started this post, so there’s not much here yet, but I’ll add to it as I can.


list view

Declaring and Instantiating List Variables and Bracket Notation

There are two ways to declare a List variable:

  1. List<Account> acctList;
  2. Account[] acctList;

I happen to love the bracket notation. Just two little keystrokes and you’re done (as opposed to an extra four with “List<>” notation).

But as I was hobbling along it seemed that brackets were supremely frowned upon used to the right of the variable name when instantiating a new list: acctList = new Account[]; gives the compiler fits!

No Good

So up until now I’ve been forced to use all those extra key strokes: acctList = new List<Account>();

eye roll

But I have happily just learned from the profoundly Salesforce-savvy, Doug Ayers, that there is some hope for the brackets to the right of the variable after all!

Here are some of the ways listed in this article, Apex Code: The Basics, that had previously escaped my searches on how brackets can be used:

Account[] accs2 = new Account[]{};
Account[] accs3 = new Account[]{new Account()};
Account[] accs4 = new Account[4];
Integer[] ints2 = new int[]{1, 2, 3};
Integer[] ints3 = new int[6];

See all those lovely brackets to the right of the variable? I’m doing my happy dance right now!

snoopy happy dance

The trick to finding this cool info, it seems, is to know that Lists and Arrays are the same thing with only one slight difference note: an Array is a one-dimensional List only, whereas a List can be one- or multi-dimensional:

String[] stringArr == List<String> stringArr  <– these are 1-dim arrays

List<List<String>>  <– this is a 2-dim list for which there isn’t an equivalent bracket (array) notation.

I think I’ll write a little more about this later.


Compound Address Fields – Can They Be Passed Into a Method?

compound address field

It’s pretty nifty that all the address fields on standard objects can be accessed in SOQL with a single word: ShippingAddress, MailingAddress, etc. I ran across a situation, however, that has completely stumped me, and after six hours of monkeying around trying various solutions I finally threw in the towel.

Here is what happened:

I wrote a little utility to see if two addresses were the same (this is the bare-bones…it needs to check for null variables to be more robust):

isSameAddress Method

The idea was that it would examine the latitude and longitude of the address fields and let the calling routine know if they matched or not.

It worked in my test routine just fine:

isSameAddressTest Method

But I couldn’t get it to work in a Trigger no matter how hard I tried and what I tweaked. Over and over again the dreaded FATAL_ERROR – Attempt to de-reference a null object.

Fatal Error

I even assigned the field to a System.Address variable and tested it with the same result.

System.debug(addressVar == null) and System.debug(acct.ShippingAddress == null) always yielded true, even when the address was fully populated.

That leaves me wondering, do compound address fields in a Trigger record always equate to null?

There must be a trick here, it just hasn’t posed itself to me just yet.

cup and ball trick

So to work around the problem I had to skip using my handy-dandy utility method and test for same addresses in the Trigger helper class itself:

Inline Address Test

This is a head scratcher and I’d really like to know what is going on, so if you know, enlighten me please!!


More soon…

 
2 Comments

Posted by on February 1, 2018 in Apex


Tags:

Sending Values To A Subflow

Sending Values To A Subflow

What Kind of Info Can be Sent Into and Received From a Subflow?

All kinds!

  • Primitive data types like text, number, Boolean, currency, date, date time, and picklist values
  • Collections of primitive data types
  • sObject collections

So What’s So Interesting About That?

Here’s what’s interesting:

Subflows, when receiving information from or or sending information to a calling flow, must have access modifiers on those variables to expose to the calling source (Other Flows, Visualforce, and Apex).

Calling Flows, however, do not need access modifiers on variables used to send information to or receive information from a Subflow. In other words, calling Flows can keep all of their variables Private.


What’s An Access Modifier?

Access Modifiers

Access modifiers define where the item can be viewed and used. For Flow variables the access modifiers are:

  • Private
    • The variable can be used only within the Flow
  • Input only
    • The value of the variable can be input into the Flow
  • Output only
    • The value of the variable can be received by a calling Flow
  • Input and Output
    • The value of the variable can be input into the Flow and is also available for a calling Flow to receive back

Private sign

[As an aside, Apex access modifiers are slightly different: Private, Public, Global]


What Does This Mean?

  • Items without access modifiers (Constants, Text Templates, and Formulas) can be used to pass values to a Subflow
  • Variables without access modifiers can be used to receive values from a Subflow
  • Only variables that need to be exposed to an external source need to have an access modifier other than Private

Using Constants, Text Templates, and Formulas

Using items that do not have access modifiers to set values for a Subflow sort of makes sense because when you call a Subflow you can simply type a value into the Source field, which would sort of be the same as using a Constant.

Subflow typed input

Typing a value into the Source field

.

Subflow Input Using Variable

Using a Constant, Text Template, or Formula in the Source field


Keeping Subflows Easy To Use

Make it Easy

When working with a single Subflow things are pretty straightforward: The Input and Output variables you see in the Target picklists will pertain to that Subflow only.

However, when a Subflow in turns uses other Subflows, the visible variables can start to get a little confusing. Variables that have been marked as Input because they are receiving information from another Subflow are now exposed to the original calling Flow. They don’t really need to be initialized by the calling Flow, yet there they are in the picklist when you click on the Target field.

Here is an example of a Subflow that has several Target variables:

Lots of Input Options

If some of these variables can be marked Private the Target selection becomes much easier:

Simplified Input List

Simplified Target Variable Selection


There you have it. Simplification. It’s a beautiful thing.
Cheers!

 
Leave a comment

Posted by on October 18, 2017 in Flow Tips & Tricks, Visual Flow


Tags:

Visual Flow Error Handling Utility Flows

Visual Flow Error Handling Utility Flows

When I start a new project I often want to skip over the preparation stage and dive right into the deep end. For me that’s where the fun is! Along those same lines I have been known to drag my feet with finishing a project, but that’s a story for another time.

So ignoring setting up all the stuff needed to handle errors and immediately dig into the heart of the project often applies to me when I’m writing a new Flow.

And that’s exactly what happened again yesterday. So I asked myself, “Self, how can you make this easier?” (or something like that)

Here is what I came up with: two utility flows

  • One to retrieve the bits and pieces needed for error reporting (and some other stuff)
  • One to do the error reporting.

Happiness is a good report card


Two Utility Flows to Handle All Errors

  • Error Handler Items
  • Error Handler

Two Utility Flows to Handle Errors


The Error Handler Items Flow

Error Handler Items Flow

Variables:

Error Handler Items Variables

This flow does two things:

  1. Fetches and returns an email collection of Users who have been designated to receive error messages
    1. Retrieving Stick on Bridge
    2. I’ve added a custom Boolean field to the User object, “Is Flow Error Recipient,” and have set it to True for Users who should receive error messages
    3. If there are no Users with this field set to True, the Users assigned to the System Administrator profile will receive the error messages
    4. This collection is necessary in the Error Handler Flow if that Flow is to send an email
  2. Returns the name of the User who launched the Flow
    1. Get User Name Formula
    2. This information is not required in the Error Handler Flow, but is made available for the calling Flow to use

Of course if you wanted to make other items available to your calling Flow you could certainly do so. This could be a handy-dandy utility flow for fetching all sorts of things that you may need on a regular basis.


The Error Handler Flow

Error Handler Flow

Variables:

Error Handler Variables

This flow does also does two things:

  1. It constructs an email Subject and Body (that’s what the Text Templates do)
  2. It sends an email to the addresses in the

Parts of an email


What is Gained?

At first blush this solution looks pretty much like the same amount of work as my prior solution where I used a utility flow to fetch the collection of email addresses and a Send Email element to report the error.

Old Error Handling Method

And certainly the number of elements I’m dragging into the Cloud Flow Designer is the same.

Where it saves time and attention is in these areas:

  • The email Subject and Body are generated by the Error Handler flow so I don’t have to create formulas or text elements in each flow to do this
  • If I want to change how the generated email looks I have only one place I need to go (as opposed to every single Flow where I have a Send Email element)
    • This is huge for me as I’m all over the page here – having a single place where these items are structured will make for more consistent error reporting
  • If I want to display the User’s name in the Flow, Error Handler Items exposes that information so I don’t have to create a function to get it
    • If I want the way a User’s name displays to change I have only one Flow to update to make that happen across all Flows
  • If I want to use other items on a regular basis I can use the Error Handler Items Flow to expose them

Save Time Fuzzy Ball

As my knowledge of Visual Flow has expanded I have revamped my error handling a couple times and I can honestly say that just the second bullet point alone is well worth the trouble of revamping it again. So that is my task for today: revisit all the Flows where errors need to be handled and install this method. For me it’s a small price to pay to be able to quickly update my error reporting down the road.

Time to Revamp


Cheers!

 
Leave a comment

Posted by on October 18, 2017 in Flow Tips & Tricks, Visual Flow


Tags:

Calling Subflow’s That Do Not Need Input

Calling Subflow’s That Do Not Need Input

Did you know that you can create Subflows that doen’t require input? It seems so logical that this could happen I’m stunned that I didn’t figure this out a couple years ago!

ROFLMAO

There is just one simple trick to making this happen: when you call the Subflow, delete the row that is looking for input.

Here is what a call to a Subflow looks like:

Call to subflow

See the little trash can to the right of the Target and Source input fields?

Trash can icon

Click on it and the row disappears.

Subflow after row is deleted


So simple and so useful!

 
Leave a comment

Posted by on October 17, 2017 in Flow Tips & Tricks, Visual Flow


Tags: ,

Get Nth Element of Collection Flow

Get Nth Element of Collection Flow

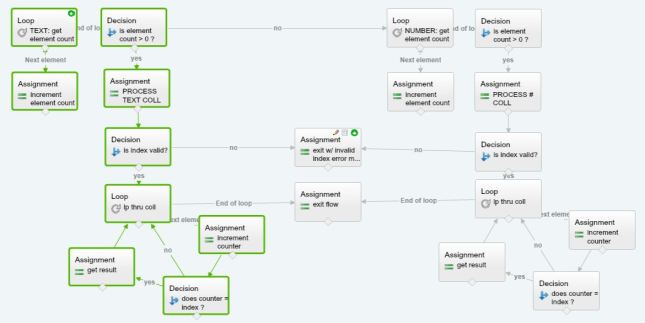
A few days ago I read in Dan Appleman’s book, Advanced Apex Programming, that “all of your Apex code should be designed to handle bulk operations. All of it – no exceptions” which shot me off on a tangent yesterday to see if I could “bulkify” my Get RecordType Id Flow (Lookup RecordType Ids in Visual Flow – A “Bulkified” Approach). My solution ended up being a combination of three Flows, with the third one returning the Id at a specified index from a collection of Ids.

As I was putting the finishing touches on that project it dawned on me that the third flow could be a generic utility Flow that simply returns the nth element of any input collection. Instead of having a Flow that only works on Id (Text) collections (and is named in such a way that I may not think to use it in other situations), why not have one that will work on all sorts of collections?

tele tubby sunrise


Overview of the Flow

The Get Nth Element of Collection Flow

So far this Flow handles two types of collections: Text collections (elements are outlined in green) and Number collections. I really only need it to handle Text collections right now, but for the exercise of figuring out how to make it work I included handling Number collections.


More Specifics

Handling One Collection


Variables

In order for this Flow to handle different types of collections (Text, Number, SObject, etc) it must have input collection variables for each type. Since mine, so far, handles only two types of collections I have two input collection variables. You could add all sorts of collections to your Flow including collections of  SObjects, like Accounts and Contacts.

Input collection variables

Other than counters the Flow also will need an input variable to receive the requested index, output variables for each collection type and variables to use in your Loop elements.

Other variables


The Flow of the Flow

The first thing it does is count the number of elements in one of the input collections. The collection that the Flow starts with is arbitrary – mine just happens to start with the Text collection.

Get element count

If the Flow determines that there are no elements present it proceeds to the next collection.

If elements are present, there is a quick check to make sure that the requested index is within the number of elements in the collection.

Check for Valid Index

Valid Index Check

If the requested index is invalid the Flow assigns a message to an output variable that the calling Flow can choose to receive and check.

If valid, another loop parses through the collection and saves the nth element to a result variable.

Finding the Nth Element


Using the Flow

Here is an example of how you would use the Flow to retrieve the 2nd element of a text collection:

Asking for the 2nd element of a collection

And how you would get your result back:

Receiving the result

Optionally you can also ask for the number of elements in the input collection, and an error message:

Getting optional items


Some Additional Details

Element Count

For my purposes I’ve exposed the count of the number of elements in the collection to the calling Flow (ElementCount is an output variable). This is totally optional. I have another utility Flow that counts the number of elements in a collection that I could use but if there was ever a need to know the number of elements and retrieve a specific element this Flow would do both in one fell swoop.

Two birds with one stone

Alternate Ending

And here is an alternate way to handle the end of the flow for any given collection:

Alternate Ending

In this ending, as soon as the result is located the Flow exits. Unless you’re working with extremely large collections this ending probably won’t save any time, but for what it’s worth, it does increase the efficiency of the Flow some infinitesimal amount.

A word of caution about exiting a loop prior to parsing the entire loop. If you do this for a loop within a loop you’ll get some really inaccurate results. This is because Salesforce doesn’t begin looping through a collection at the beginning of it if you’ve previously exited it somewhere in the middle. This was a situation I discovered very early on in my Flow experience which gave my simple mind much grief at the time (Flow Loop Doesn’t Start at First Record)!


Cheers!

 
2 Comments

Posted by on October 12, 2017 in Flow Tips & Tricks, Visual Flow


Tags: , ,

Lookup RecordType Ids in Visual Flow – A “Bulkified” Approach

Lookup RecordType Ids in Visual Flow – A “Bulkified” Approach

I find myself feeling so excited when I learn new tricks that can elevate my prior and current work, and this is a new approach to retrieving RecordType Id’s in a “bulkified” manner (as opposed to a single record approach in my prior post Lookup RecordTypeId Subflow) that has done just that.


What is Bulkification?

Bulkification is the process of structuring code to handle the processing of multiple records (as opposed to a single record) for better code efficiency. On the Salesforce platform this is critical as it is a multi-tenant platform with shared resources. Dan Appleman, author of Advanced Apex Programming, has gone as far as to say “All of your Apex code should be designed to handle bulk operations. All of it–no exceptions.”

no exceptions.jpg

After reading that I began to think…hmmmm…I wonder where I can change some of my Flows to “bulkify” them to a greater extent. His quote does specify “Apex,” but what about Flows? In that light I set out to see what could be done, starting with my Get RecordType Id flow.

Now, as you’ll see below, the bulkified process is much more complex than simply calling a single record lookup Flow two or three times. And to be sure, there is a trade-off: Multiple DML statements versus multiple looping. So after completing this project I decided it would be prudent to keep the original flow in my tool box for those instances where I need a single RecordType Id, even though it isn’t “bulkified.” 🙂


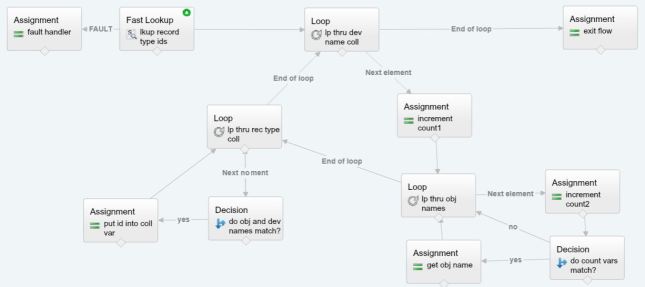
Overview of “Bulkified” Get RecordType Ids Flow

The Bulkified Flow

How it Works

  • The Flow receives two collections
    • One collection has object names
    • One collection has developer names
    • Input collection variables
    • The names at each index in these collections must correspond – in other words, if the first object name is “Account” then the first developer name must be a developer name for an Account RecordType
  • It then looks up all active record types saving the following fields into a collection (you could include inactive record types as well, if you wanted to)
    • Id
    • DeveloperName
    • SObjectType
  • Now, transferring the requested RecordType Ids requires three loops: an outer loop and two inner loops within that outer loop
    • The first two loops (the outer loop and first inner loop) get a Developer Name – Object Name pair
  • The Outer Loop
    • The outer loop parses over the developer names collection
      • Loop thru developer names collection
      • Within this loop a count variable (count1) is incremented and another count variable (count2) is set to zero
      • Increment count1
      • (It was just arbitrary that I looped over this collection first and the object names collection second – you could choose to do it in the opposite order if you’re so inclined)
  • The Second Loop (First Inner Loop)
    • The second loop parses through the object names collection
      • Loop thru object names collection
      • Within this loop the count2 variable is incremented
        • When count2 is equal to count1 the object name is stored
      • At the end of the loop, control passes to the third loop
  • The Third Loop (Second Inner Loop)
    • The third loop parses through the record type ids collection
      • Loop thru record type ids collection
      • When the developer name matches the developer name of the first loop’s variable and the object name stored from the second loop the Id for that record is saved in a collection
      • Add RecordType Id to a collection
      • At the end of the loop, control passes back to the first loop where the next element in the developer names collection is then processed
  • The final output is a collection of RecordType Ids

Word of Caution

Be sure your inner loops always parse through the entire collection. Exiting a collection early in an inner loop can give you erratic results. Who needs that?! (See Flow Loop Doesn’t Start at First Record)


How to Call The Get RecordType Ids Flow

Since this Flow requires input of two collections I decided to create another Flow that constructs those collections and launches the one outlined above (I call it the Get RecordType Ids Launcher).

Get RecordType Ids launcher

This Flow does the following:

  • It receives the developer names and object names in separate input variables
    • wrapper variables
    • (Additional DeveloperName# and ObjectName# variables can be created if more than three RecordType Ids are needed)
  • Then it adds the names to collection variables
    • Adding names to collections
  • After the collections are built it launches the Get RecordType Ids Flow and receives back a RecordType Ids collection
  • Finally it returns the RecordType Ids collection to the calling routine

Getting a RecordType Id for a Specific Index

So how do you get an Id at a specific index within a collection? In order to do that I wrote a third Flow (I call it my Get RecordType Id by Index Flow).

Get recordtype ids by index

  • This Flow receives a collection of RecordType Ids and an Index number
  • It starts by doing a quick check to make sure the Index is within the number of elements of the RecordType Ids collection
    • Index error check
  • Then it loops through the Id collection
    • Loop thru Id collection
    • For each element a count variable is incremented
    • If the count is equal to the Index the RecordType Id is stored
  • Finally it returns the stored RecordType Id

Putting it All Together

Putting it all together

When this solution is put to work the following happens:

  • A call to the Get RecordType Ids Launcher Flow retrieves a collection of RecordType Ids for the object name – developer name pairs entered into that Flow
    • Calling the Get RecordType Ids Launcher Flow:Call to Get RecordType Ids Launcher
    • Getting a collection of RecordType Ids back:

      Getting RecordType Ids collection

      Getting a Collection of RecordType Ids Back

  • Now, for each RecordType Id that is needed, use the Get RecordType Id by Index Flow to retrieve the Id
    • Calling the Get RecordType Id by Index Flow:Calling the Get RecordType Id by Index Flow
    • Getting the RecordType Id backGet RecordType Id back

thoughts.jpg

A Couple More Thoughts

  1. By all intents and purposes you could choose to combine the “launcher” Flow with the Get RecordType Ids Flow. I chose to break these processes apart to keep increase the number of options I have for retrieving RecordType Ids.
  2. The Flow for returning a specific RecordType Id by index could be (and probably should be) a generic Flow that receives a collection variable (containing any sort of information) and returns the value from the collection that corresponds to the specified index. After this occurred to me I wrote a more generic version of it: Get Nth Element of Collection Flow.

So there you have it. In my box of Flow tools I now have a Flow that will lookup a single RecordType Id, and a set of three Flows that I can use when I need multiple RecordType Ids but I need to conserve DML calls.

Cheers!


heavy weight

 
Leave a comment

Posted by on October 12, 2017 in Flow Tips & Tricks, Visual Flow


Tags: , ,

Flow DML Error with RecordDelete and RecordUpdate

Flow DML Error with RecordDelete and RecordUpdate

Here is a quickie on handling Flow DML errors for RecordDelete and RecordUpdate when there are no records in the database that match the lookup criteria.


solutions-1

The RecordDelete and RecordUpdate elements will throw an error if no records are found:

So if there is any chance the database will not be able to find a record to delete or update you need to account for this.

There are two possible solutions:

  • Handle the DML fault
  • Do a FastLookup and check for the presence of records prior to performing the RecordDelete or RecordUpdate

Handling the DML Fault

RecordUpdateOnly

Here are three methods I use to handle faults:

  • Use a Send Email element to notify Users who should receive error messages (uh…that would be me!) that there has been a problem
    • This is a very common way of handling flow faults
  • Use an Assignment element to add a value to a variable that is passed back to a calling Flow
    • This one works great in situations where you want control over how and where the fault is handled (like when one Flow calls another and you want the calling Flow to handle the error)
  • Just skip on to the next element in the Flow
    • In other words, point both the regular arrow and the Fault arrow to the next element in the Flow and just ignoring that an error has occurred
    • Sticking_tongue_out

Using a Send Email Element

I have a utility Flow that looks up and returns collection of User email addresses for Users that have a custom variable that I’ve named “Flow Error Recipient” set to True. I then use that collection to email all the Users who should be notified that an error has occurred.

Send email element

  • The body of the email address is essentially the Flow Fault message dolled up with the Flow name and what-not:
    • ErrorMsg
    • In this particular example I’ve used a Formula to create a dull, dry error message, but a Text element could also be used and you could go to town making it all pretty and adding all sorts of information, like the Flow name, version, and whatever else your heart desires
  • The Subject has the name of the Element that went awry, in this case “UpdateClientAcct”

lets-go-down-to-funky-town


Using an Assignment Element

This is a very concise and quick way handle faults.

ErrorHandler

Essentially you’re just doing nothing, or maybe you’re initializing an output variable with a value that a calling Flow can evaluate. In the example above I’ve pointed the fault toward an Assignment element that assigns a variable to itself (essentially doing nothing).

Assign a variable to itself


Forging on Ahead Method

forgeahead

If you needed your Flow to do other things after the RecordUpdate or RecordDelete element you would point both the regular arrow and the fault arrow toward whatever comes next in the Flow. Pft.

Flow fault handling

Caveat for This Method!

  • If you have any AfterUpdate or AfterDelete triggers this method may throw an error if those triggers do not watch for a null trigger collection:
    • Error Occurred: The flow tried to delete these records: null. This error occurred: CANNOT_INSERT_UPDATE_ACTIVATE_ENTITY: dlrs_HhEnrollTrigger: execution of AfterDelete caused by: System.DmlException: Update failed.
  • Workaround? Use the Fast Lookup Method shown next

Method Using Fast Lookup

LkupLoopUpdate

This solution takes a little more work, but perhaps is a more “correct” approach than just forging on ahead?  😉

  1. Lookup the records to be updated or deleted and put them in a collection variable
  2. Check to see if the collection variable is null
    1. If null, either exit the Flow or continue with the next thing that the Flow needs to do
  3. If updating the record, do one of the following:
    1. Loop through the collection variable making updates and adding the updated records to a new collection variable, then update the new collection using a FastUpdate
    2. Use a RecordUpdate
  4. Or, if deleting the records, do a FastDelete on the collection

Ta da!

no more error messages

 
Leave a comment

Posted by on October 6, 2017 in Flow Tips & Tricks


Tags: , , , ,

LockerService

LockerService

What is LockerService?

Following the advent of Lightning Components came the introduction of a security feature for those components called LockerService.

LockerService is a suite of technologies for providing security to Lightning components including (but not limited to):

  • Enforcing JavaScript ES5 Strict Mode
    • This keeps JavaScript interacting with components int he same namespace
  • Containing DOM access to the same namespace
    • This keeps components from different namespaces from interacting with each other
  • Providing wrappers for non-secure global references
    • Objects that are considered “non-intrinsic,” such as window, are considered to be secure
    • LockerService provides a secure version of these objects for Lightning components to interact with (example secureWindow) where access to the object is filtered
    • The secure wrapper can be used in the same way as the non-intrinsic object
  • Restricting JavaScript methods to supported JavaScript API methods only
    • You can find the methods that are supported by going to:
      • https://&lt;myDomain>.lightning.force.com/auradocs/reference.app
      • where <myDomain> is the name of your custom Salesforce domain
  • Enforcing stricter Content Security Policies (CSP)
    • This prevents cross-site scripting, clickjacking, and other code injection
Gum wrapper dress

Gum Wrapper Dress!

LockerService became a critical update in the Summer ’16 release.


Resources


Leave a comment

Posted by on October 3, 2017 in Security


Tags:

ClickJack Protection

ClickJack Protection

What is Clickjacking?

Clickjacking, also known as UI Redressing, is a type of cyber vulnerability where a user is tricked into clicking something different from what they think they’re clicking. When this happens embedded code or script executes without the user’s knowledge performing undesired actions.

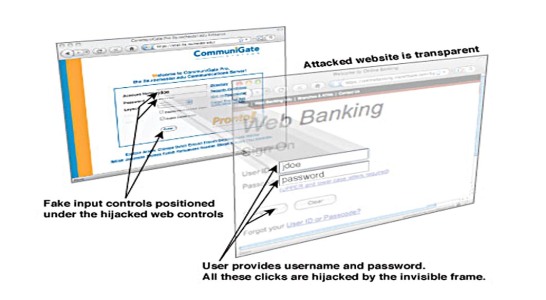
Web pages become clickjacked when a transparent HTML page is placed atop the genuine page (the genuine page becomes “hidden” behind or “re-dressed” by the transparent page). The transparent clickjack page contains hidden code or script which is strategically placed directly over an action item on the genuine page. The user believes they are clicking on something safe from the hidden page, like a button or link, but in reality they’re clicking on a link on the clickjack page.

For example, imagine an attacker builds a web page that has a button on it that says “click here for a free iPod”. On top of that page the attacker has loaded an iframe with your email account and has lined up the “delete all messages” button (which is now invisible) exactly on top of the “free iPod” button. When the user clicks on what looks like the “free iPod” button they are actually clicking on the invisible “delete all messages” button. In essence the attacker has “hijacked” the user’s click, hence the name “Clickjacking”. (link to this example)

Example of how a page is clickjacked

When this occurs the code attempts to do something like some of these examples:

  • Make the user a follower of someone on Twitter or Facebook
  • Share or like links on Facebook
  • Click a Google AdSense ad to generate pay-per-click revenue
  • Play a YouTube video to gain views
  • Download and run malware on your computer
  • Make a user’s social networking profile public
  • Enable the user’s webcam or microphone
  • Buy something from Amazon

1371819306-definition-of-clickjaking-what-s-clickjacking


How is Clickjacking Prevented?

There are two main ways to prevent clickjacking:

  • Sending instructions to the browser to not allow framing from other domains
    • This is a client-side measure where the user installs an add-on to their browser or uses a browser that ensures all content is visible
  • Putting code in the web page that specifies how to handle the page when it is framed by another website
    • This is a server-side measure where the page developer or website owner specifies how pages should be displayed when they’re placed within a frame on another site
      • The two most common ways to detect and prevent clickjacking are:
        • By setting an X-Frame Options HTTP header
        • Bay adding JavaScript code that attempts to detect if the page is being opened in an iframe
    • This type of protection is respected by modern browsers, but not by legacy browsers (older browser versions)
      • In order to protect against clickjacking in legacy browsers some HTML markup and JavaScript code must be added to the page itself

Salesforce Security Measures to Prevent ClickJacking

  • Clickjack protection measures need to be considered for both Salesforce orgs and community sites such as Sites.com and Force.com sites
  • Salesforce uses both X-Frame Options and “frame-busting” scripts
  • Visualforce pages set to API version 26.0 or earlier that do not render the standard Salesforce header (the page’s showHeader attribute is set to false) do not include HTML markup and JavaScript code to prevent clickjacking in legacy browsers
    • The Summer ’17 release critical update added two new security settings
    • When the settings to protect VF pages are enabled, HTML markup and JavaScript code is added to the page if necessary, regardless of the API version

Clickjack Protection Controls for an Org

  • All standard Salesforce pages have clickjack protection enabled by default. (Clickjack protection was automatically enabled for all non-Setup Salesforce pages as a critical update in the Spring ’14 release.)
  • Administrators have control over how Visualforce pages in an org are handled:
    • Enable clickjack protection for customer Visualforce pages with standard headers
    • Enable clickjack protection for customer Visualforce pages with headers disabled
    • Capture
    • (Navigation to settings: Setup > Security Controls > Session Settings)

Clickjack Protection Controls for a Site

  • For Sites.com and Force.com sites pages have three options as of the Summer ’15 release:
    • Allow framing by any page (no protection)
    • Allow framing by same origin only (recommended)
      • framing pages must have the same domain name and security protocol
    • Don’t allow framing by any page (most protection)
    • (Navigation to settings: Sites.com: Overview > Site Configuration; Force.com sites: Setup > Develop > Sites)

How Does a Page Look When Clickjack Protected?

  • A protected page may appear in one of these ways:
    • As a blank page within an iframe
    • As an error message
    • As a separate page

Other Stuff:

Considerations using Visualforce components on the Homepage:


Cheers!

conficker_worm_2011

 
Leave a comment

Posted by on October 3, 2017 in Security


Tags: